-
Read more
Guide for Extracting Android 12/13 files on Windows 11
Many users can’t extract Android 12/13 system files on Windows 11 since they no longer have Windows 10 PCs. Here are proven ways to extract files successfully on Windows 11
Solution Steps:
-
Initial Extraction Attempt
●Right-click the ZIP file and select "Properties"
●Check if there's an 'Unblock' checkbox at the bottom of the Properties dialog
●If present, check the box and click "Apply"
●Try extracting the file again
-
Alternative Method (if Step 1 fails)
●Move the ZIP file to a local folder not synced with cloud services (OneDrive/DropBox/etc.)
●Attempt extraction again in the new location
-
Troubleshooting (if extraction still fails)
●Right-click the file and select "Properties"
●Please provide:
a) A screenshot of the General tab
b) A screenshot of the Security tab
Any more problem, please feel free to contact us support@joyingauto.com or info@joyingauto.com
-
-
Read more
新建网页 1 Joying Android 12.0 Qualcomm Snapdragon System Update
Note:
* This update is only workable for the Android 12.0 QCM6125 Qualcomm Snapdragon System car radio.
* Different updated file for different head unit version system. Please check clearly below updated tips. If you are still confused on the update details, please contact us first. Otherwise, your CarPlay/Android Auto function cannot be used after updating and you need to pay us $10 to activate this function again. after payment, please contact us to help you activate.
* Please update the head unit system with Windows 10 computer. this is very important.
Following is the newest update for Android 12.0 radio
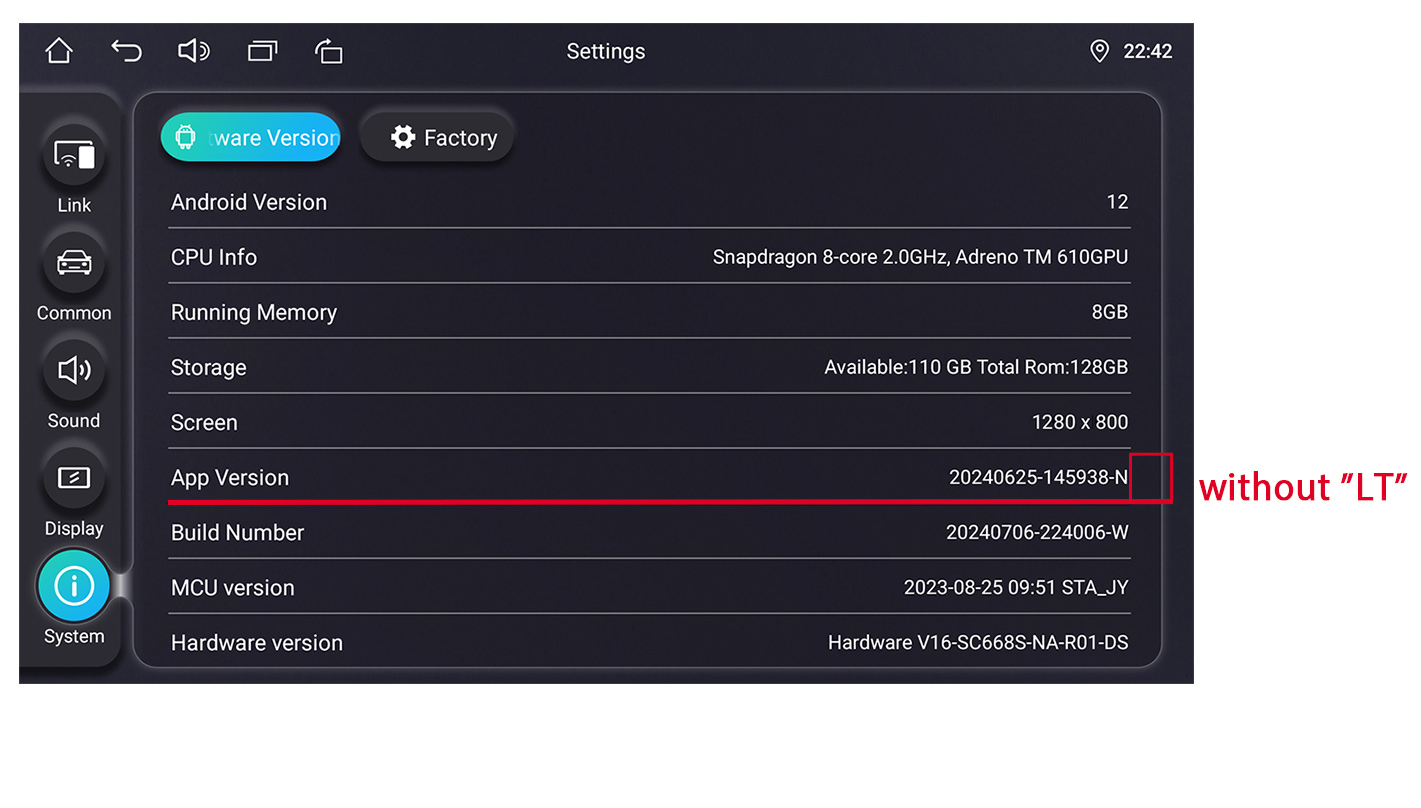
Here is the firmware for 1280*800/1920*720/1280*720 radio without "LT". please check below exampled picture:
Updated file please click Here
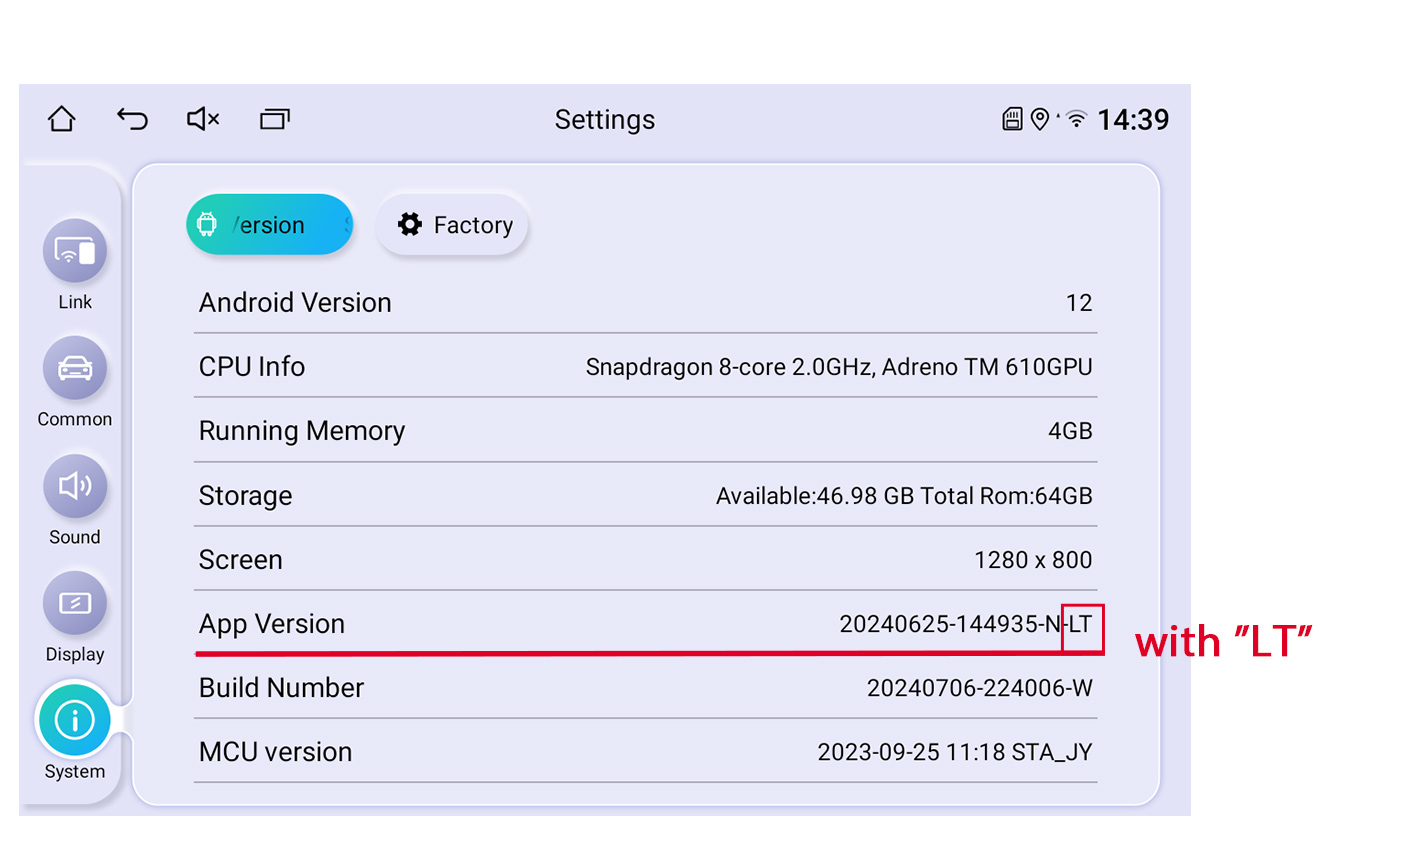
Here is the firmware for 1280*800/1920*720/1280*720 radio with "LT". please check below exampled picture:
For example stereo model: JY-HZS01N4 JY-UZS03N4
Updated file please click Here
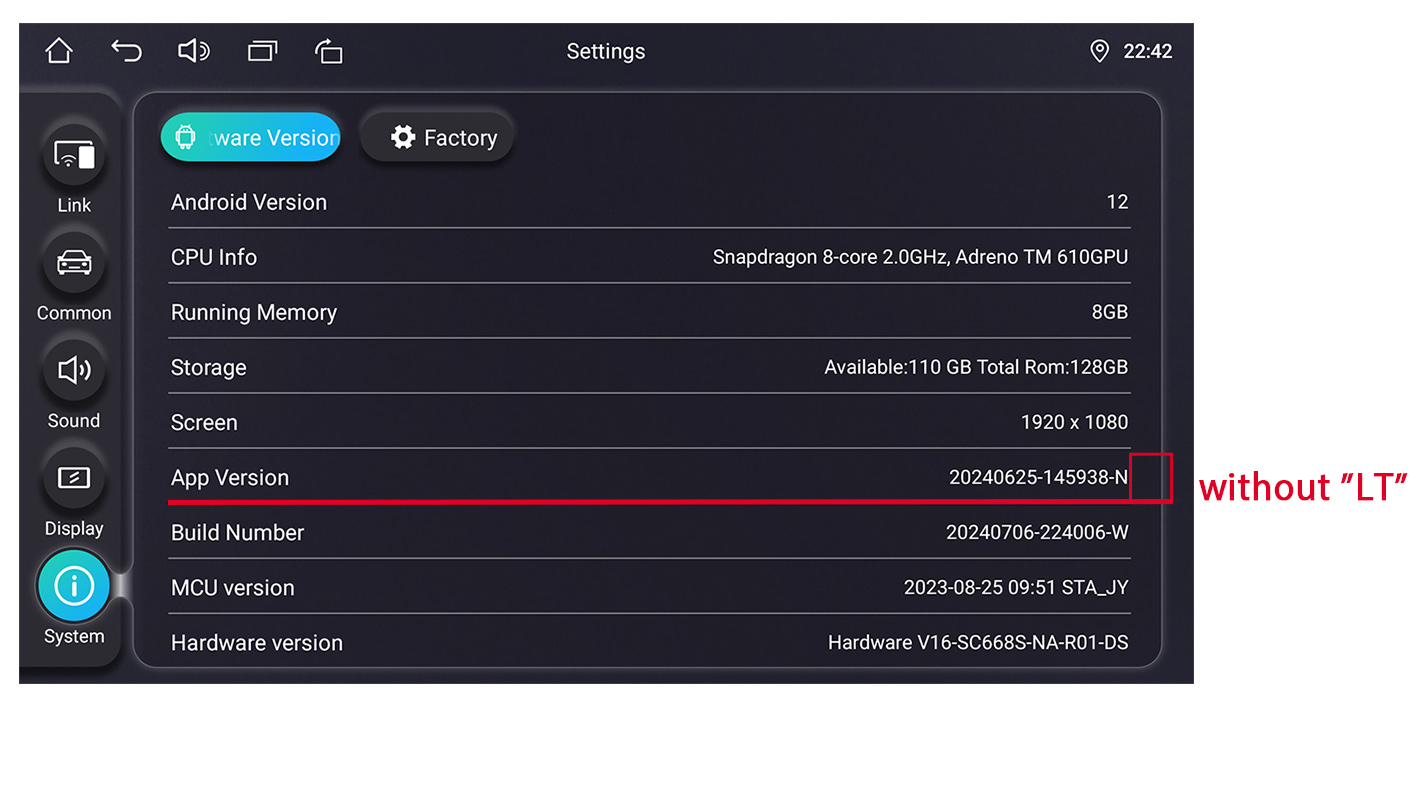
Here is the firmware for 1920*1080 / 1920*1200 / 2000*1200 radio without "LT", please check below exampled picture:
Updated file please click Here
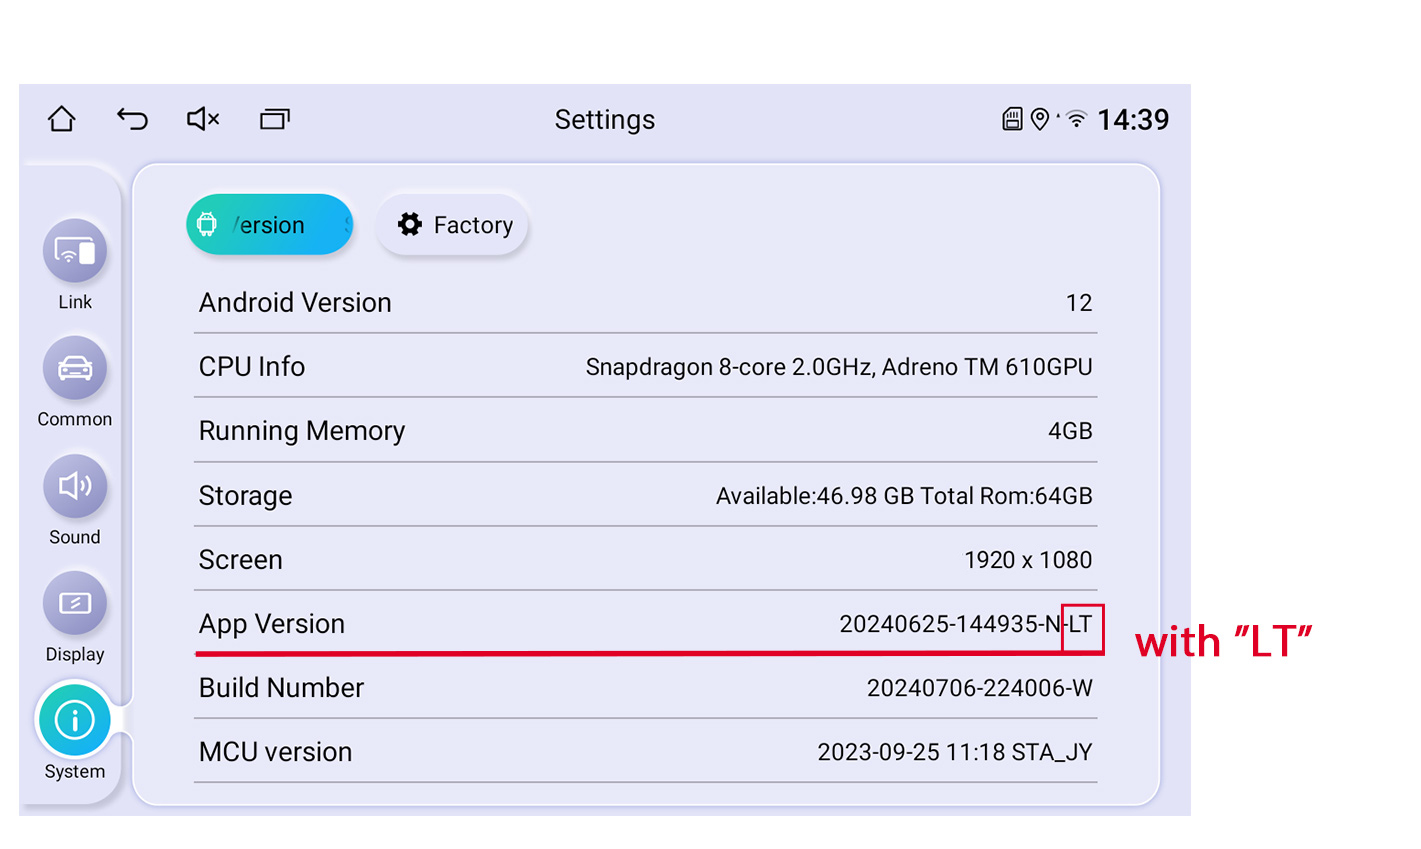
Here is the firmware for 1920*1080 / 1920*1200 / 2000*1200 radio with "LT", please check below exampled picture:
Updated file please click Here
Here is the firmware for 1280*720/1024*600/800*480 radios with below UI:
Only applicable for these models: UZ135N4, UZ139N4, VZ130N4, VZ131N4, HZ123N4
Updated file please click Here
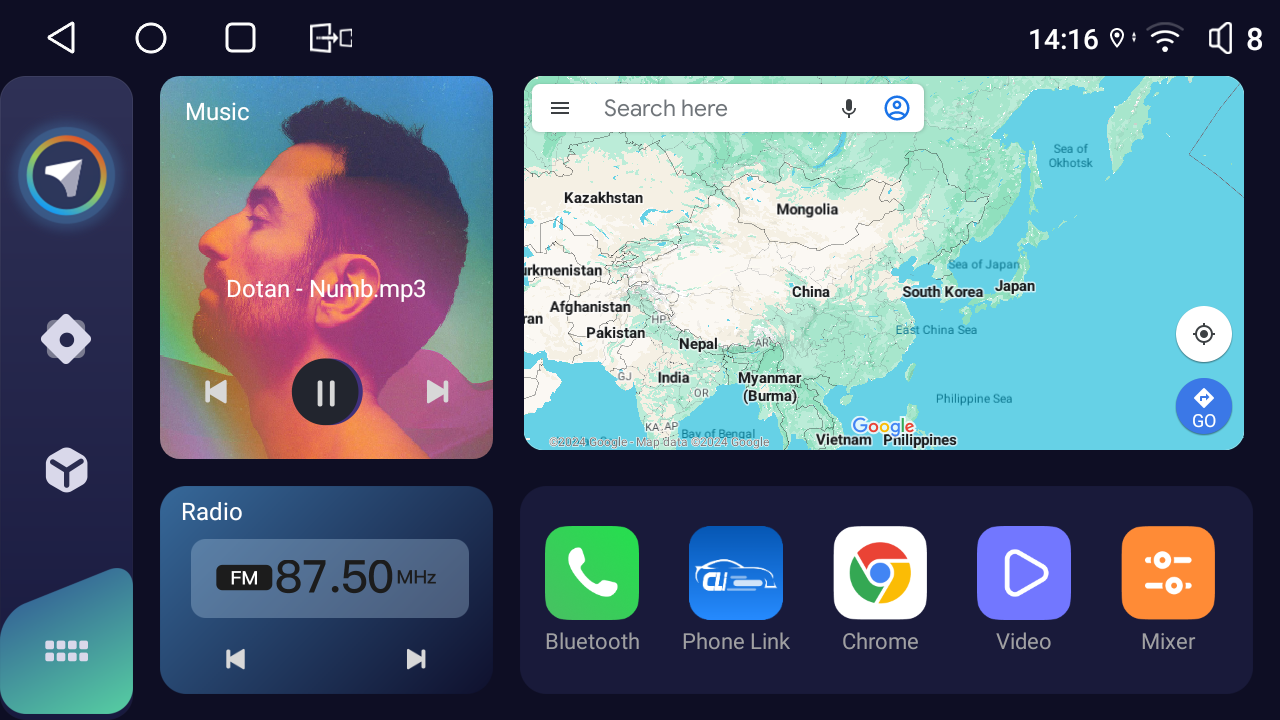
Following is the update (2024-8-16) for Android 12.0 radio
Here is the firmware for 1280*800/1920*720/1280*720 radio with "LT". please check below exampled picture:
For example stereo model: JY-HZS01N4 JY-UZS03N4
Updated file please click Here

Here is the firmware for 1280*800/1920*720/1280*720 radio without "LT". please check below exampled picture:
Updated file please click Here

Here is the firmware for 1920*1080 / 1920*1200 / 2000*1200 radio with "LT", please check below exampled picture:
Updated file please click Here

Here is the firmware for 1920*1080 / 1920*1200 / 2000*1200 radio without "LT", please check below exampled picture:
Updated file please click Here

Here is the firmware for 1280*720/1024*600/800*480 radios with below UI:
Only applicable for these models: UZ135N4, UZ139N4, VZ130N4, VZ131N4, HZ123N4
Updated file please click Here

System Update Guide
Prerequisites:
1.USB Drive Requirements:
●Must be formatted as FAT32
●Capacity must be under 32GB
●Recommended: Use a high-quality USB 2.0/3.0 driveUpdate Procedure:
1.File Preparation:
●Download the firmware update package on a Windows 10 computer
●Unzip the downloaded2.Transfer Files:
●Open the unzipped folder
●Select all files (Ctrl+A)
●Copy and paste them directly to the root directory of your USB drive
●Important: Do NOT unzip the "update_car" package● Example of unzipped files:

3.Initiate Update:
Connect the USB drive to the JOYING OTG USB port
The system will automatically detect and begin the updateImportant Notes:
● Update Duration: Approximately 5-8 minutes
● During update:
✓ Do NOT power off the unit
✓ Do NOT disconnect the USB drive
✓ Do NOT operate the stereo● When you see "Please remove update device. Device will reboot"
✓ Safely remove the USB drive
✓ Allow the system to restart automatically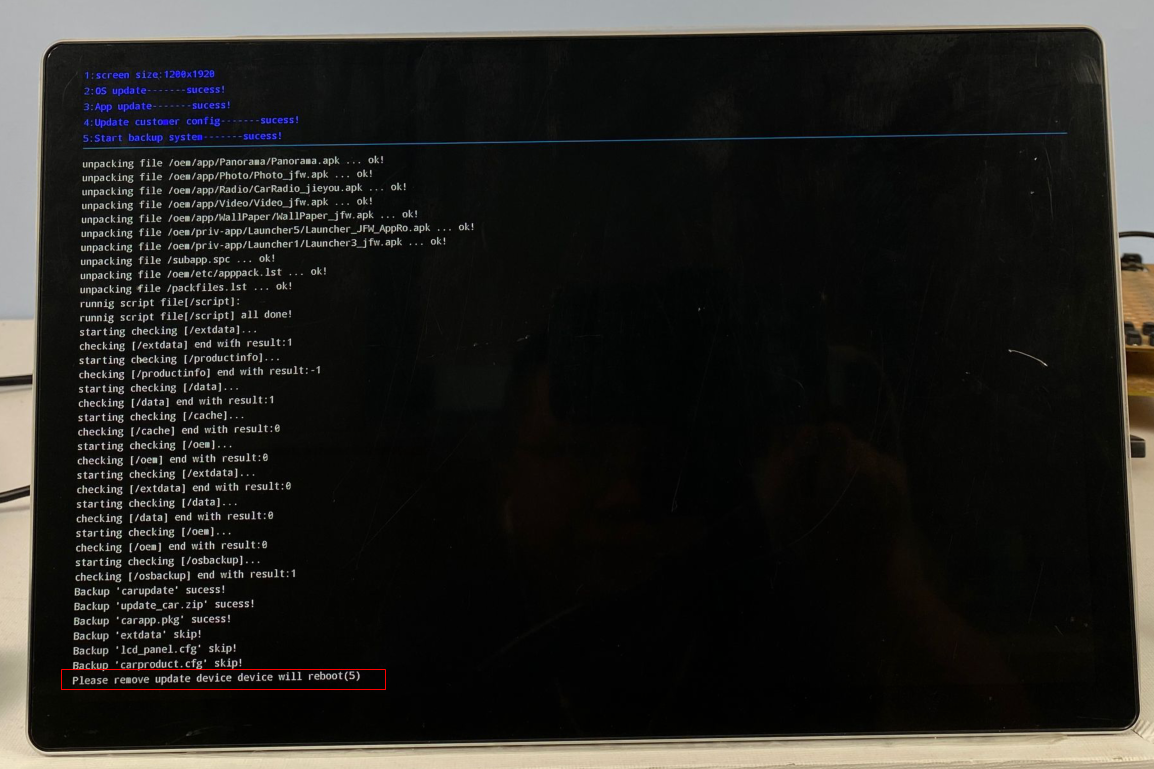
Post-Update:
After reaching the Home screen:
✓ Wait 1-2 minutes for system initialization
✓ Some settings may need to be reconfigured
✓ Recommended to check all system functionsHave any problem during the system update, please contact us support@joyingauto.com or info@joyingauto.com
-
Read more
新建网页 1 How to set the wallpaper or theme on Android 12.0 QCM6125 stereo?
How to set the wallpaper?
1. Set the resolution of the picture on the computer to be the same as the screen resolution of your car radio, save a picture in day mode (light color tone), and save a picture in night mode (dark color tone). (For the rotatable car radio, you need to save two more pictures with vertical screen resolution.)
Note: Save the pictures in JPEG or PNG format.
2.The following is an example of a rotating car radio (resolution is 1920*1080):
(1)Create a new folder named "wallpapers" in the root directory of the USB disk.
(2)In the "wallpapers" folder, create another two new folders named "day" and "night".
(3)Depending on the resolution of your car radio, create a new folder in the "day" and "night" folders, and name it "1920x1080" (for putting the horizontal wallpaper).
(4)For a rotatable car radio, you need to create two new folders in the "day" and "night" folders, named "1920x1080" (for putting the horizontal wallpaper) and "1080x1920" (for putting the vertical wallpaper).
(5)Copy the day mode picture to the "1920x1080" folder in the "day" folder;
Copy the night mode picture to the "1920x1080" folder in the "night" folder.
(For rotatable car radio, copy the vertical day and night mode pictures to the "1080x1920" folder.)
3. Insert the USB flash drive into the USB port of the stereo, open the "Wallpaper" APP in the head unit,
Click on the "import" button on the left side of the screen, then click on the search button behind "Start position",
and then click on the "Start copying" button after /storage/USB/ wallpapers appear to complete the import of wallpapers.
Finally, you can browse the corresponding wallpapers on the left side to make settings.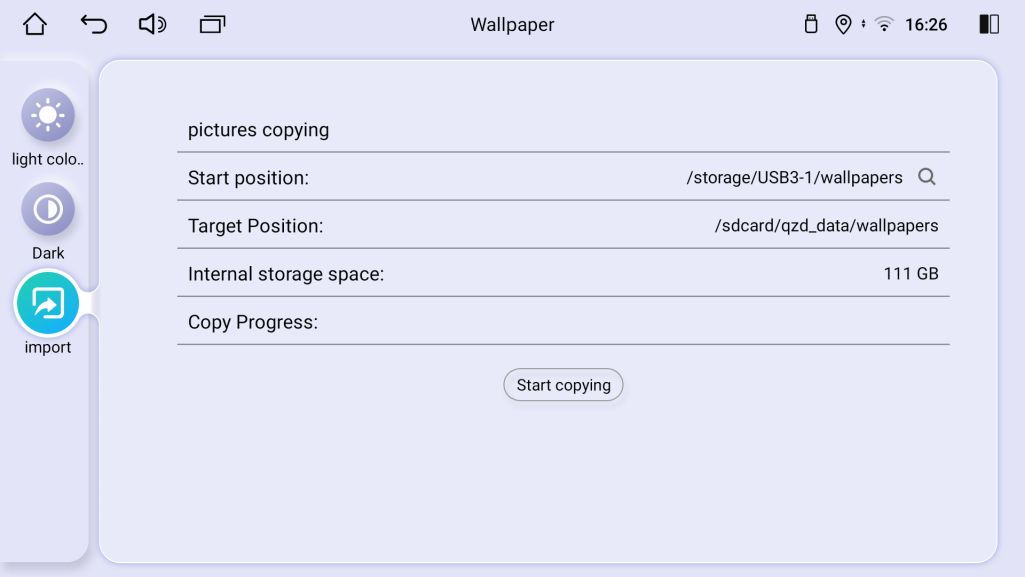
How to set the theme on the stereo?
Users can choose either UI1 or UI2 for their home screen with this option.
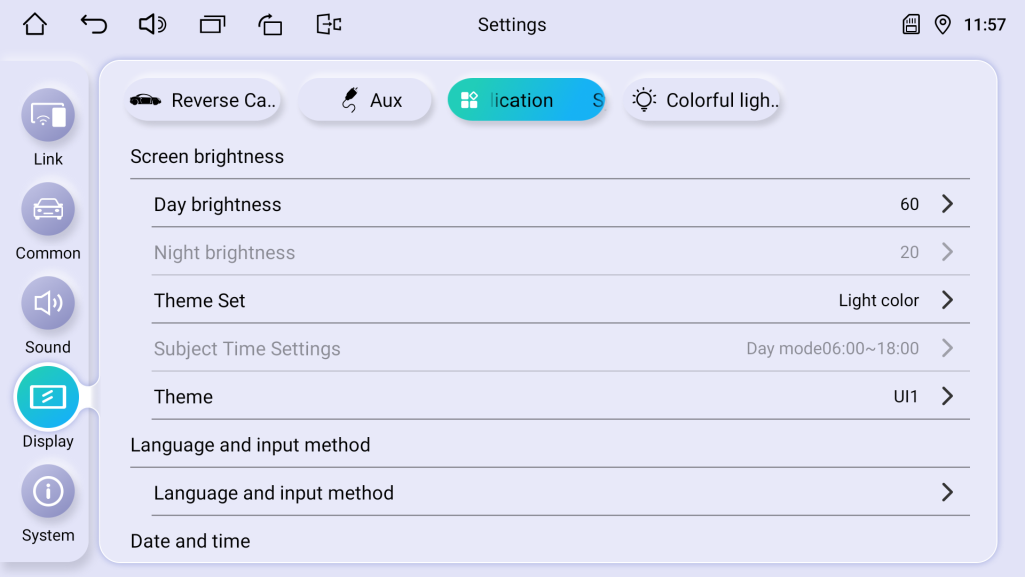
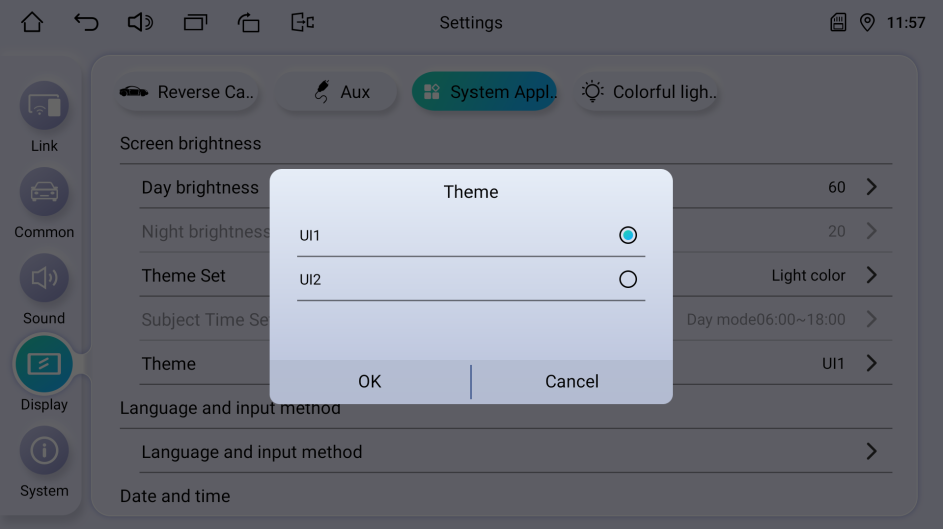
Any more confusion, please contact support@joyingauto.com or info@joyingauto.com
-
Read more
新建网页 2 How to set third-party launcher on Android 12.0 vehicle stereo?
Most customers want to add the third-party launcher on the QCM6125 After-market car multimedia.
Please download this apk on the head unit. Please click Here to download.
How to set third-party launcher as default launcher?
1. download CarSettings_jfw.apk from the computer : xxxx
2. After you install the CarSettings_jfw.apk, then install your third-party launcher.
3. Then go to "settings-Display-application-theme" to choose third-party launcher as default launcher .Any more problem, please contact us support@joyingauto.com or info@joyingauto.com
-
Read more
新建网页 2 How to solve ?
The volume dial stops working on Android 12 QCM6125
If your car audio android music player volume dial controls abnormally, below two ways you can have a try:
First ideas:
1. whether the A port resistance value is 15.0K, B port resistance is 8.2K, pull-up resistor is 47.0K and error voltage is 51.6mv?
2. whether knob reverse and Knob function exchange settings are off? (see as below)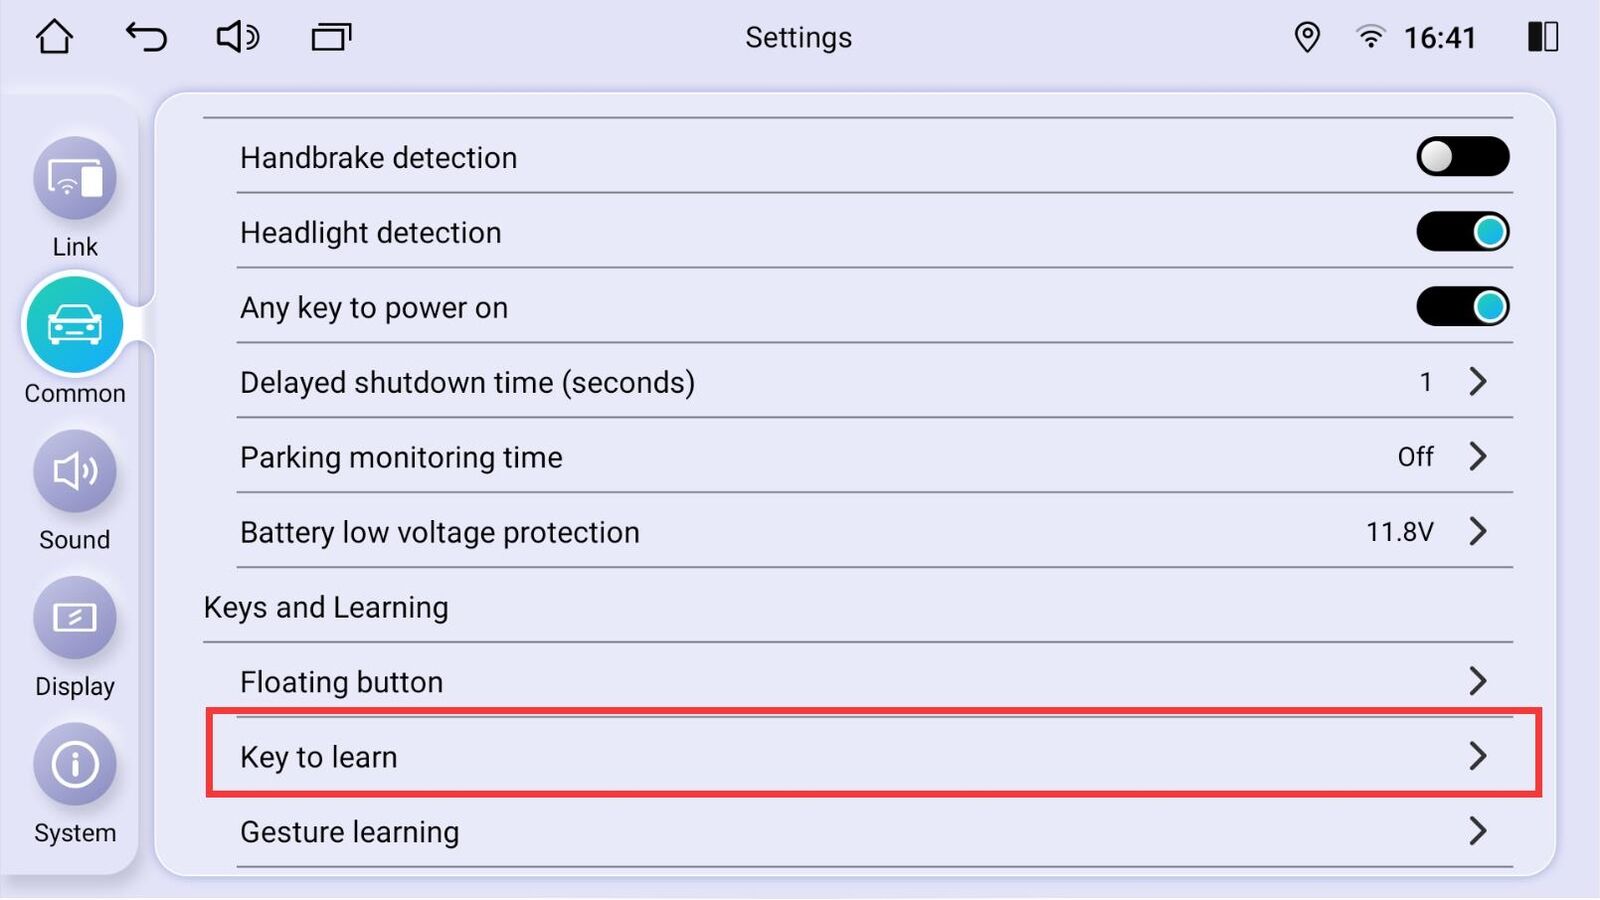
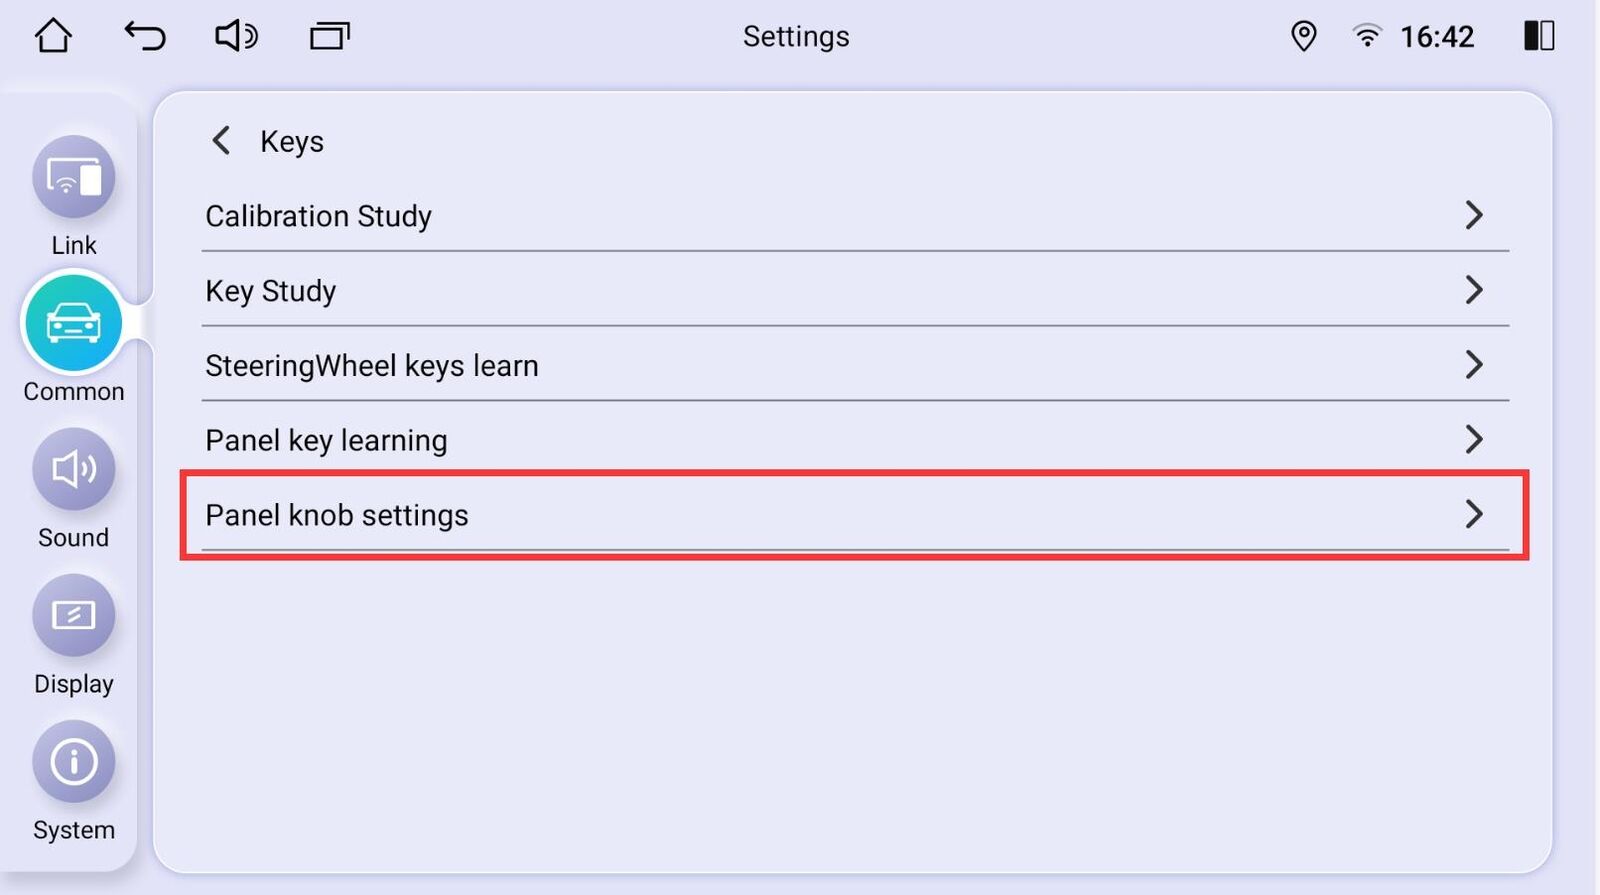
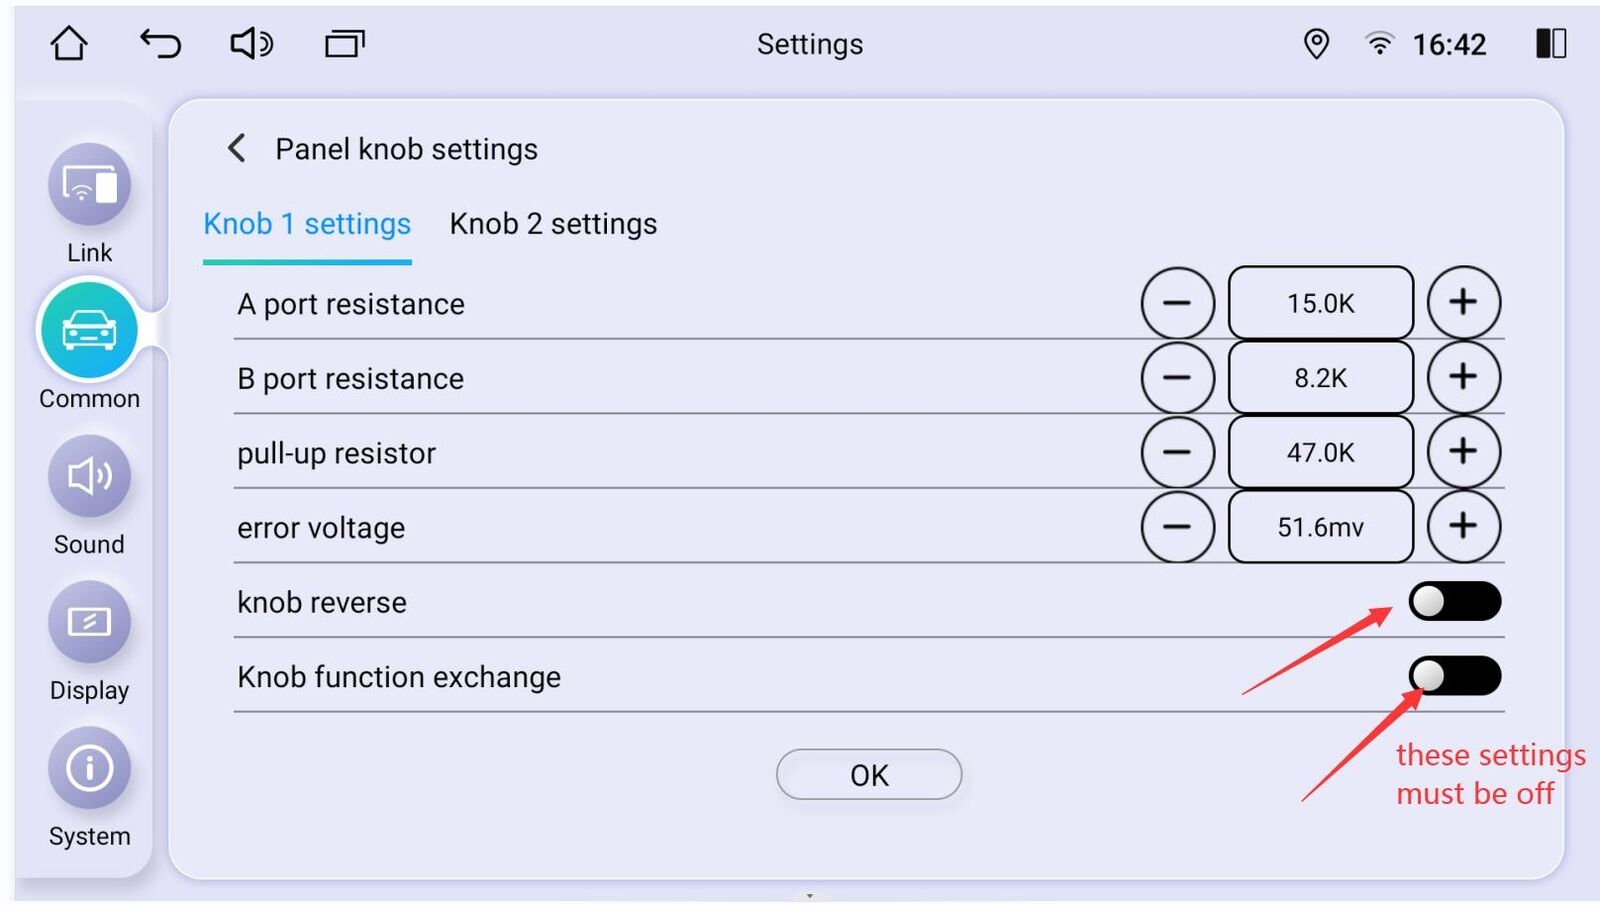
If you are sure that above settings are correct, then the volume knob still doesn't work, then please adjust the error voltage from 51.6mv to less or much, then see if the volume knob returns to work or not.
If you adjust error voltage from 51.6mv to less, the volume knob can work, please click OK. If you adjust error voltage from 51.6mv to much, the volume knob can work, please click OK.NOTE: After you set the error voltage value, please reboot the head unit.
Second ideas:
1) Please try to disconnect and connect the screen ribbon as below:
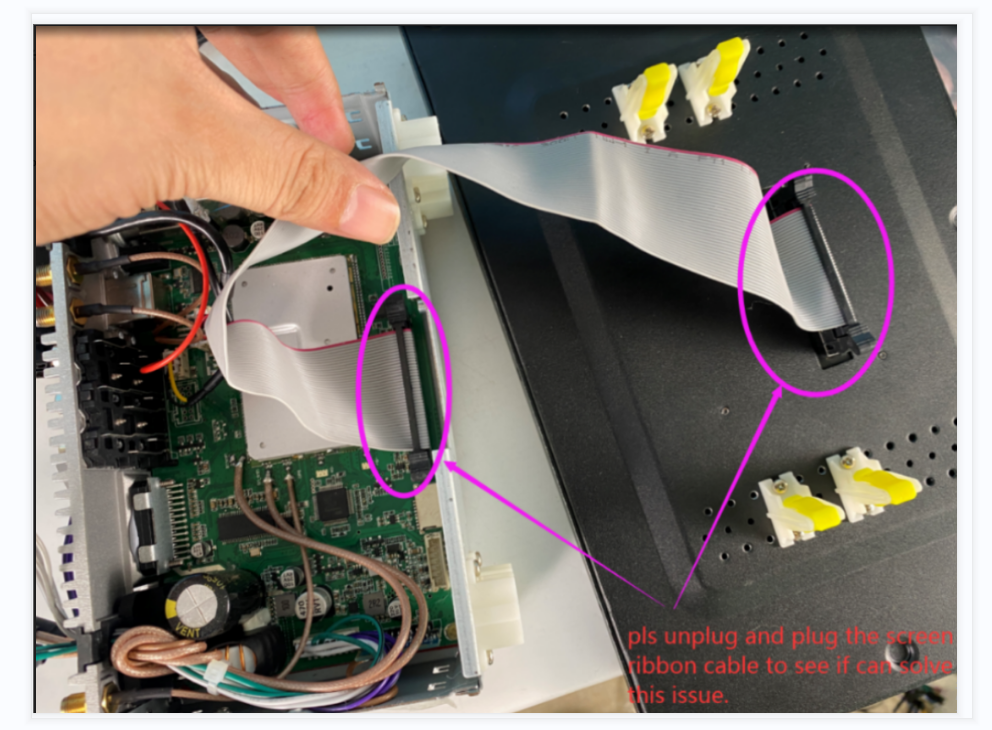
2) After finishing above steps, please reboot the head unit.
After doing all above steps and the volume still not work properly, please contact us support@joyingauto.com or info@joyingauto.com .


